Form without tables
To create a form using tables, even a beginner webmaster can do it, but for formatting a tableless form, some skills are required. Let's consider a simple example, such as a login form.
Form code:
<div id="login_form">
    <form action="#" method="post">
        <div class="input_row">
            <label for="username">User:</label>
            <input type="text" id="username" name="username"/>
        </div>        <div class="input_row">
            <label for="password">Password:</label>
            <input type="password" id="password" name="password"/>
        </div>
        <div id="button_login">
            <button type="submit">Login</button>
        </div>
    </form>
</div>
Wrap each row in a div to create spacing. CSS for our example is as follows:
#login_form{
    width: 300px;
    height: 90px;
    background-color: #C7D4E0;
    padding: 30px;
    border-radius: 10px;
    border: 1px solid #4046F6;
}label{
    width: 150px;
    float: left;
    text-align: left;
    font-family: Georgia;
}
input{
    width: 150px;
    background-color: #FFFFFF;
    color: #FFFFFF;
    font-family: Georgia;
    border: 1px solid #B7C2F6;
}
input:focus{
    border: 1px solid #d76269;
}
.input_row{
    margin-bottom: 10px;
}
#button_login{
     margin: 0px 150px;
     display:inline-block;
}
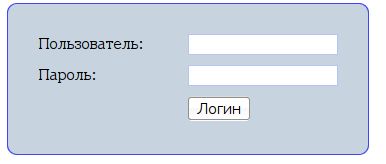
The final touch is positioning the button below the input fields (using margin in our case). The result looks something like this:
 You can download the complete example (just in case =) ) here: form